Phần I: Cài Đặt RIS server
Nguồn:
Training Kit 70 – 270
http://support.microsoft.com/kb/325862
Các bước cấu hình:
Cài Window 2003 Server RIS
Tạo Image lưu trên server
Tạo file answer
Authorize RIS trong Active Directory
Phân quyền USER để dùng RIS cài window
Môi trường làm việc - Cấu hình phần cứng và phần mềm:
Máy server: Sử dụng window 2003 server, phải cấu hình các dịch vụ mạng sau:
Domain Name System (DNS Service)
Dynamic Host Configuration Protocol (DHCP)
Active Directory "Directory" service
Máy client: Phải có đĩa mềm hay card mạng có thể boot được.
1.Cài Window 2003 Server RIS
Start -> Control Panel -> Add or Remove Programs. -> Add/Remove Windows Components -> Remote Installation Services -> Next. -> Finish ->restart computer.
2.Tạo Image lưu trên server:
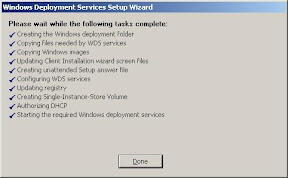
Khởi động RIS: Start-> Administrative tool-> Remote intallation service setup (Run -> Risetup)
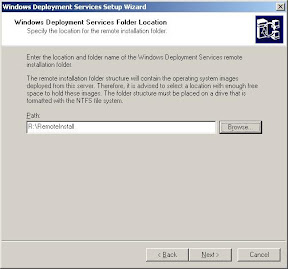
Click next tại màn hình welcome -> xuất hiện hộp thoại, Chọn vị trí đặt thư mục share file ảnh
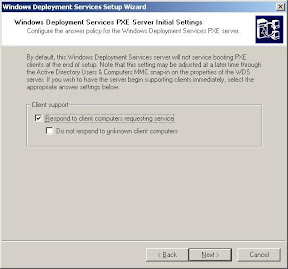
Chọn dòng Respond to client computers requesting service
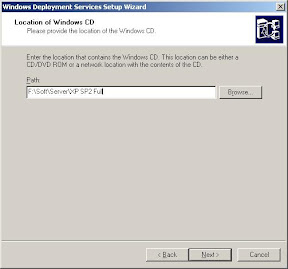
Chọn đường dẫn chứa source của win cần cài đặt.
Giải nén file DEPLOY.cab trong thư mục Tools của winxp. Chạy file setupmgr.exe.
Click next trong hộp thoại welcome ..., Chọn dòng Remote Installation Services
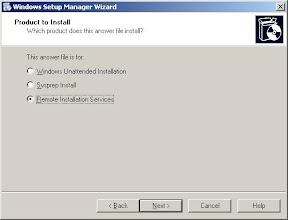

Điền đầy đủ thông tin vào cửa sổ Window Setup Manager
Sau đó lưu file remboot.sif tại đường dẫn R:\RemoteInstall\Setup\English\Images\WINDOWS\i386\templates (nơi chứa source cài đặt window)
4.Authorize RIS trong Active Directory
Sau khi cài đặt RIS, RIS server phải được authorized trong Active Directory.
Start -> Administrative Tools -> DHCP. Right-click DHCP -> Manage Authorized Servers.
Nếu không có server trong danh sách thì ta click Authorize, chọn tên hay địa chỉ IP của RIS server, khi đó click OK.
5.Phân quyền USER để dùng RIS cài window
Start -> Administrative Tools -> Active Directory Users and Computers.
Tạo OU, trong OU tạo user (user này ta cấp quyền để cài đặt window). Click phải vào OU vừa tạo, chọn Delegate Control.
Click next tại hộp thoại welcome -> click add tại hộp thoại tiếp theo -> ta chọn user vừa tạo trong OU lúc nãy.
Click next, chọn "Create a Custom task to delegate" trong hộp thoại task to delegate -> next
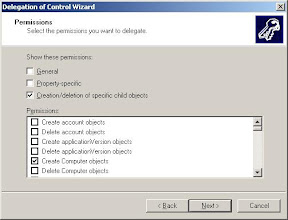
Chọn option "This Folder, existing object in this folder, and..." trong hộp thoại Active Derectory Object Type.
Click next và chọn các option "Create/Deletion of Specific Child Object" và option "Create Computer Objects" -> click next và finish

1 nhận xét:
nhận xétĐúng là cái này thật hữu ích cho những người như mình, thanks!
Reply